nRF52 Linux Over-the-Air Update
Overview
At the time of creating this project, Nordic had only two ways to perform an Over-the-Air (OTA) Device Firmware Upgrade (DFU):
- Through nRFConnect on a Windows PC
- Through nRFConnect on iOS/Android
While this likely covers most upgrade scenarios, it doesn’t cover upgrades using most Single-Board Computers (ie. Raspberry Pi, BeagleBone Black, etc) or upgrades using Linux in general. This project provides this unsupported functionatily.
Performing a DFU with nRFConnect on iOS
To get the firmware side of things setup, the first step was to build and flash a firmware image that had a DFU Bluetooth service running. Luckily, Nordic provides a Buttonless DFU example in their SDK so this was built and flashed onto the device. Once the board was visibly advertising (verified using the nRFConnect app), a DFU package was generated from the same base application. After transferring that package to the iPhone, the nRFConnect app was used to trigger and complete an update. When the update was finished, the device was verified to be advertising and functioning as expected. Nordic has provided a detailed guide for going through this process which is out of the scope of this article and can be found here. The high-level steps are as follows:
- Build a secure bootloader using a generated private key
- Build the unbonded buttonless dfu example in SDK
- Use the
mergehextool to combine the Softdevice, application, bootloader settings, and secure bootloader into one.hexfile - Flash the
.hexfile onto the device and verify it runs properly - Use the
nrfutilutility to create a DFU package of the application - Transfer the package to the smartphone and then use the nRFConnect app to perform an update
Familiarizing myself with BlueZ and D-Bus
The Bluetooth stack installed on most Linux distrobutions is BlueZ. Like many low-level applications in Linux, it provides access to its functionality through D-Bus. D-Bus is an Inter-Process Communication (IPC) method that presents a standardized interface for processes to talk to each other. In the case of this application, things like scanning for devices, connecting to them, and general interaction were all handled through this interface.
To get a sense of what function calls exist and the format of their responses, the BlueZ API docs are a good start and can be found here. In addition, sdbus was very helpful as a CLI tool for quick dry-runs of commands. By having one terminal open with busctl monitor and another open for triggering commands (ie. busctl call ...), deciphering through the opaqueness of D-Bus became slightly more bearable. The most ergonomic (and time-efficient) solution ended up being a tool called dbus-codegen that was provided with the Rust D-Bus crate used in the project. By merely entering the necessary paths and interfaces, a full Rust API could be automatically generated! More information can be found here.
Once basic D-Bus calls could be made from the application, signal matchers were setup to catch asychronous information (ie. connected events, notification values, etc). Despite D-Bus having a steep learning curve but eventually platueating in difficulty, BlueZ proved to be the inverse. There are many quirks and undocumented functionalities that unfortunately need to be debugged through trial and error. Comments regarding these rough spots are sprinkled throughout the code to make things clearer to future readers.
Implementing the nRF52 DFU Protocol
Putting nRF52 into DFU Mode

Once connected to the nRF device, enable notifications for the DFU service. From there, send the Enter DFU Mode command and check the response value. If the command was successful, the device will disconnect and begin readvertising as an upgradeable device. The default device name will be DFUTarg but this can be modified to something unique. See Nordic’s infocenter for more details.
Transferring Initialization Packet
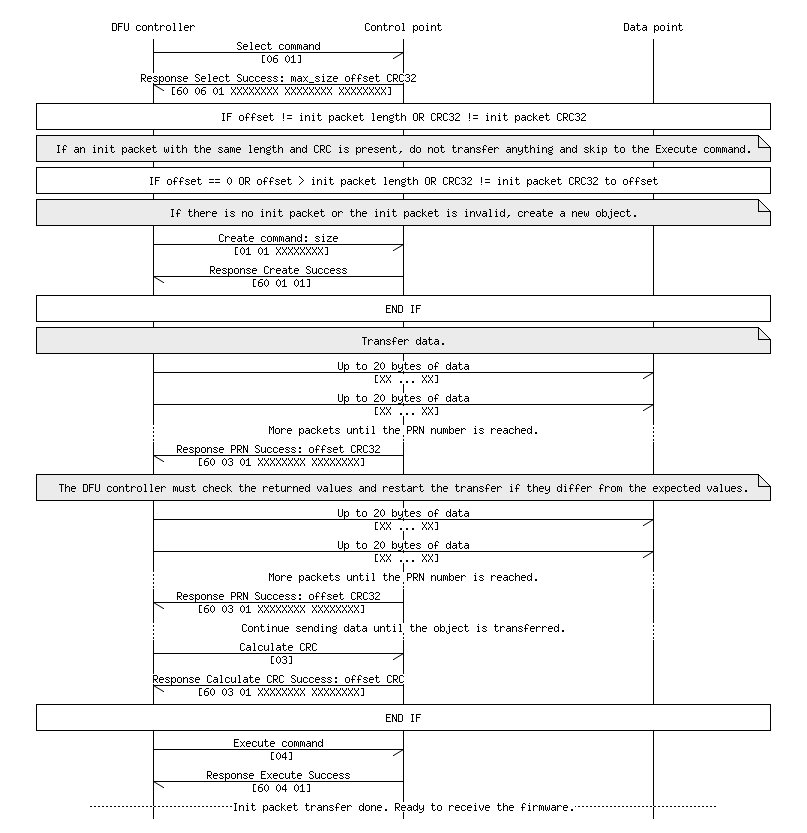
Once reconnected the DFU device, there will be a new service with two characteristics available: Control Point and Data. All “commands” will be sent to Control Point and any actual binary data will be sent to Data. In plain English, this is the rough set of steps necessary to send a chunk of data:
- Select which type of object that’s going to be sent
- Either Command (Init Packet) or Data (Firmware Image Packet)
- Determine how much of the object is going to be sent based on max size
- Determine if the Init Packet has already been successfully sent based on the CRC value
- If it’s been successful, send the Execute command, skip the remaining steps, and continue to the firmware image section
- If it was unsuccessful or this is the first time sending the init packet continue to the next step
- Send the Create Object command for a Command object with the size determined earlier
- In 20 byte packets, send over the object until you’ve reached the object size
- Send the Calculate CRC command and verify that it matches with the expected CRC calculated locally
- If they match, send the Execute command and continue to the firmware image section
- If they don’t match, retry the process again starting at the Create Object command (Step 5).
Transferring Firmware Image Packet(s)
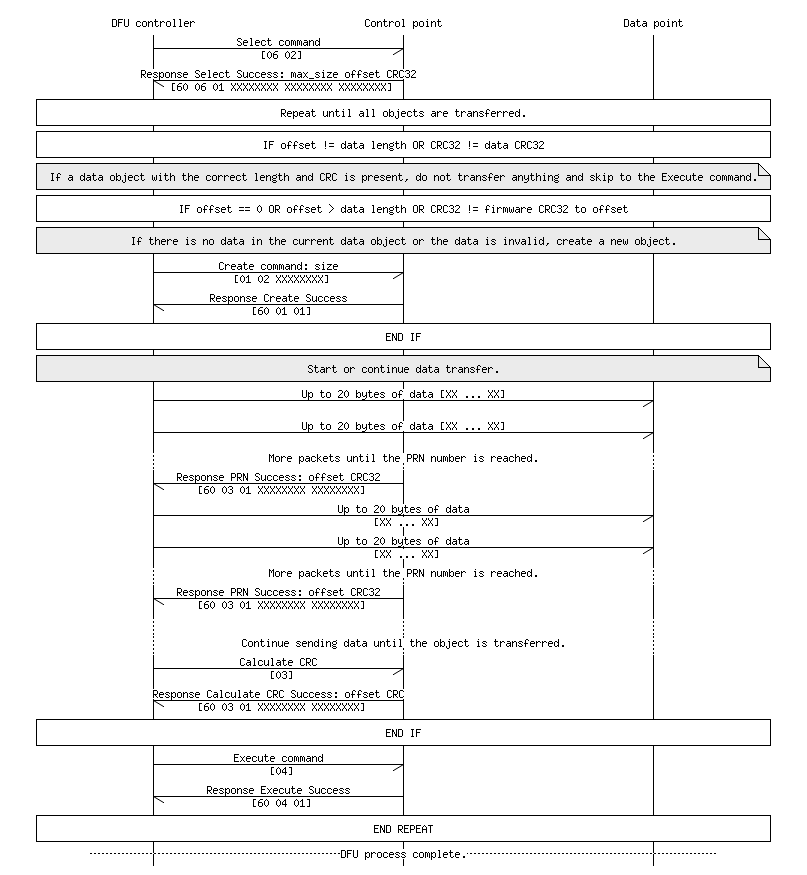
The process for transferring the firmware image will be very similar to the initialization packet. There are only two real differences:
- Instead of selecting and creating Command objects, Data objects will be used.
- The max size for a chunk of DFU data tends to be 4096 bytes. The init packet will be quite small (<256 bytes) and therefore is always sent in one go. Data corruption is consequently much less likely. A firmware image will be at least 40KB however and will need to be sent in multiple chunks. So instead of making one pass through Steps 5-9 outlined above, a pass will need to be made for each 4096 byte chunk of the firmware image. In the case of a disconnect (not unlikely with Bluetooth), the update can be continued from the last successful data chunk. This requires some specific logic and error handling in the application.
Design Considerations
From an architecture standpoint, the entire application is one large state machine. Instead of using a library, the solution chosen for this project was a process_event and process_action configuration. When events are received by the controller, process_event determines the next action based on the current state. From there, process_action performs this action and changes the current state if necessary. If another action should be performed before waiting for another event, this action is returned from the function and process_action is called with this new action. This loop happens continually until there is nothing to actively do.
As Bluetooth disconnections are a common occurrence, the application was constructed so that it could reconnect to the device and continue from where it left off in the update process. One limitation with the current implementation is that if the nRF device is somehow reset and is no longer in DFU mode, the application won’t autoconnect; it will need to be restarted.
Finally, there are many permutations of possible error combinations at different stages of the update process. For the sake of time (and honestly motivation), any errors outside of normal operation are logged to the user and deemed unrecoverable. The application will quit in these circumstances.
Wrap Up
While there is always room for improving the robustness of a project like this, it seems to be in a stable-enough spot that it can be used by others. Hopefully someone can extend its current functionality!
Link to repo: https://gitlab.com/aparsons/nrf_ota_linux_updater